I love seeing videos that people produce within Club Penguin. I’ve always been a big fan of CPMVs (Club Penguin Music Videos) and the little video ‘shorts’, too.
I want to offer a bit of help to those who make videos. Lots of people ask me what software we use, and how we make videos here at CP, so I thought I’d share a few tips to help out!
In this blog post, I am assuming that you are at least 13 years old. Social media networks such as YouTube require that you be this old to use their service for video hosting. If you are younger than 13, this tutorial isn’t for you.
#1 – To make an HD video, you’ll need HD footage.
This is the most important part to me — quality. If you’re recording footage of Club Penguin on a desktop computer (PC, Mac, Linux), then you’re using the current Adobe Flash version of the game. So this means you can stretch CP to any size without losing any visual quality for the most part!
I record video on an Apple MacBook Pro with Retina Display, because of the resolution. The higher the resolution of your video footage, the better for video. An HD video is 1920×1080 pixels, so if you can record footage that’s even larger, then you can zoom in on the characters.
We actually use a little piece of software to “trick” the MacBook Pro to switch into 4K (4096 x 2160), then use Google Chrome in “Presentation Mode” to make the CP window as HUGE as possible. 🙂
#2 – Pick screen recording software that works for you.
I recommend Camtasia or ScreenFlow for video capture. If you’re on a PC, then FRAPS is also a good choice, as it’s fairly cheap ($40). Just pick something that makes sense to you. I like ScreenFlow because you can record and make edits right within the software. In fact, you can do a LOT with ScreenFlow on Mac, like create subtitles, transitions, music and even export directly to YouTube.
#3 – Keep it simple.

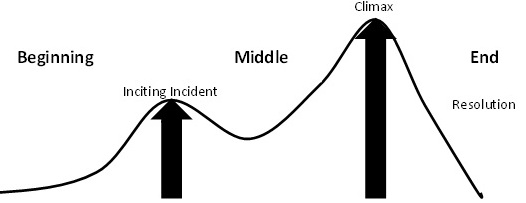
A simple story works best. Something with a beginning, middle and end. The best stories have some sort of tension — like a villain, or something the hero needs to overcome to win.
Write down your ideas on paper first before you record. Adobe Story is a very useful free tool for writing scripts (but will require an Adobe account.)
#4 – Write out subtitles

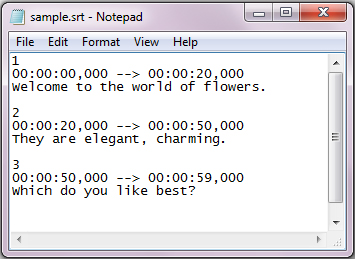
This one is fairly simple, but takes a bit of time. For every CP video we make, we create an .SRT file — which is just a text file with timecodes in it. Like I said before, ScreenFlow is the simplest way to do this, but you can also use a plain text editor like Notepad on Windows, or TextEdit on Mac.
If you take the time to do this, then it’s fairly simple to translate the video into other languages. Plus there are people in the world that can’t hear, and this way you’re considering them as well! 🙂
To create one, just write out a text file, and “Save As” with .srt as the file extension. Here’s what a subtitle will look like:
1

00:00:00,000 --> 00:00:03,000

Good morning, class!
#5 – Only use complicated software if you need to do something really complicated.
We do use Adobe After Effects for some really special moments in videos, and it’s amazing what you can do with it. However, it can also be too complicated, and you’ll need to have a LOT of time available to work within it if you’re new to the system. We tried using After Effects for the first few episodes of The Spoiler Alert, but later moved to only doing a few key things there instead. Now we edit the majority of the episodes in Adobe Premiere instead.
Bonus Tip: Audio is half of what you see.
We’re lucky enough to have some very, very talented audio professionals on our team, and they can make an okay video feel amazing.
If you spend a bit of time and use sound FX, change up the music often, and add “ambience” (birds chirping, wind blowing, etc.) you can make a video feel even more polished. Here’s a little inside scoop from the Star Wars sound designers, for example:
Hope this helps! Thanks to everyone who’s made amazing videos over the years. Keep up the great work!
-Your pal, Polo
Pup1one (@Pup1one)
Polo Field, you are so awesome. I’m freaking out right now. OMG OMG OMG OMG!! 😀 Thanks so much!!!!
Waddle On,
Pup1one
clubpenguinperapin
Yay! Now I know how to do translatable subtitles. Thanks Polo!
~Perapin 😉
Harry Cp (@MyCPTales)
Thanks so much for the tips! Do these past the test http://goo.gl/bHTwFm 🙂
Happyblue128 (@Happyblue128cp)
Wow, these are actually really useful!
Thanks, Polo!
Green N Cool (@Greenncool)
Thanks for the great tips, Polo! They’ll come in handy
ocean6100
These tips are extremely helpful; thanks so much, Polo! I fully intend to utilize them in future videos I make, including the CP Imagineers Show! While I don’t think much of Windows Movie Maker, I might start using it to throw together the clips, then using Adobe Premiere to edit all of the fancy stuff.
Would you recommend Movie Maker for the simple stuff?
greengirl816
Reblogged this on Greengirl816 in Club Penguin and commented:
Thanks for the tips Polo! This is EXACTLY what I needed!
kommandokristopho
Reblogged this on Kommando Kristopho's Blog.
Roudrasish1
Hi there!
This post helped a lot of us especially Penguins who gives Walkthroughs, Tips, etc. Thank you Polo Field for using you’re effort and writing this for us. Keep up the good work!
Waddle On!
-Roudrasish1
mega7000
Awesome and useful tips. Thanks Polo Field
waterkid
Thanks for the tips Polo Field, I made a video myself using Camatasia 8 for my CP army, the Light Troops – hope you like it 😀
ғorмal dυde (@Formal_Dude)
How do I make those pop noises for when penguins speech bubbles appear?
Sajo8
Amazing tips! I have bookmarked this page! I can’t wait for when I’m going to make a new video! For screen recording, I think Apowersoft is the best. But, I’ll try screenflow!
Clumpypoo
This is awesome tips!! Hey Polo, since you enjoy CPMV’s here’s one I made that everyone seems to love!! Pleaseee watch it and tell me what you think!!!! Here is the link: https://www.youtube.com/watch?v=Hr8XDOmamqc
JoelCPenguin
Nice
12345ify (@12345ify)
Hi Polo,
Just wondering, what is the name of the software you use to ‘trick’ the macbook pro into making it a higher resolution?
Polo Field
I can’t remember. I tried one piece of software, but it was a bit buggy. So now I just use the native retina resolution.